future,forkjoin实现原理

线程
创建线程的2种方式。
- 继承Thread
- 实现Runnable
有人会说还有一种,那就是使用Callable,并且能获得返回值呢。实则单独使用callable是做不到的,他们所说是通过FutureTask,或者调用线程池的submit方法,随后获得了一个future,而实际上这2种都要通过Runnable接口。FutureTask实现了Runable接口,submit也是将callable封装成了FutureTask,随后都返回了一个future供你获得返回值,或进行其他操作。
以下代码是callable的使用
    public static void main(String[] args) throws ExecutionException, InterruptedException {
        ThreadPoolExecutor executor =  new ThreadPoolExecutor(3, 4, 5, TimeUnit.SECONDS, new LinkedBlockingDeque<Runnable>(2));;
         FutureTask<String> future =
            new FutureTask<String>(new Call());
        executor.execute(future);
        Future submit = executor.submit(new Call());

        new Thread(future).start();

        System.out.println(" lalalal ");
//        future.cancel(true);
        if(future.get() == null){
            System.out.println(" 未拿到 ");
        }else{
            System.out.println("future.get() = " + future.get());
        }
    }

class Call implements Callable{
    @Override
    public String call() throws Exception {
        System.out.println(" 开始运行 ");
        Thread.sleep(1000);
        return "what";
    }
}
Future
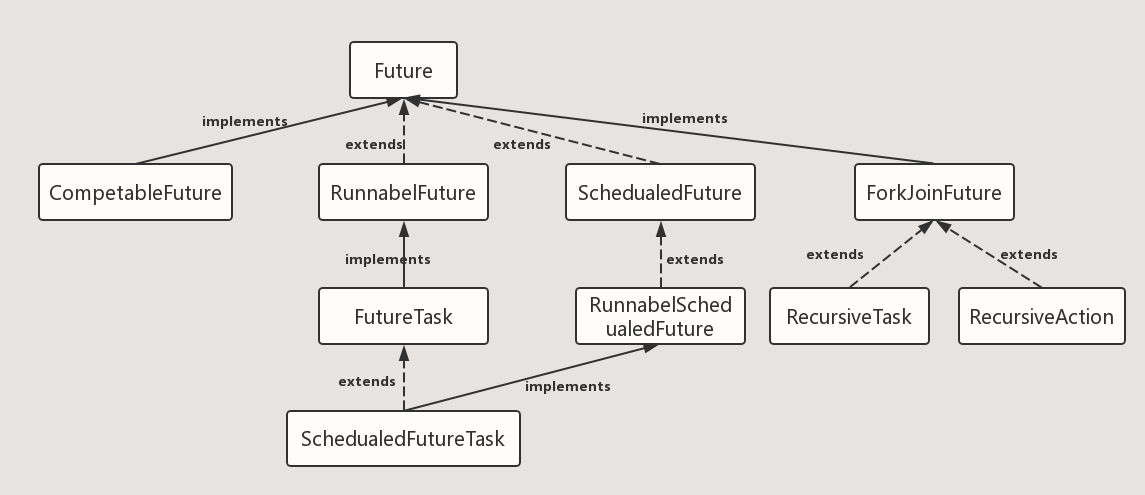
future为何物为什么他能有返回值,下图是他的继承体系。通过源码阅读ScheduledFutureTask中future的实现在FutureTask中。等下再通过源码解析他是如何获得返回值等基本方法。

实现/接口类
RunnableFuture
    这个接口同时继承Future接口和Runnable接口,在成功执行run()方法后,可以通过Future访问执行结果。这个接口都实现类是FutureTask,一个可取消的异步计算,这个类提供了Future的基本实现,后面我们的demo也是用这个类实现,它实现了启动和取消一个计算,查询这个计算是否已完成,恢复计算结果。计算的结果只能在计算已经完成的情况下恢复。如果计算没有完成,get方法会阻塞,一旦计算完成,这个计算将不能被重启和取消,除非调用runAndReset方法。

    FutureTask能用来包装一个Callable或Runnable对象,因为它实现了Runnable接口,而且它能被传递到Executor进行执行。为了提供单例类,这个类在创建自定义的工作类时提供了protected构造函数。
SchedualFuture
这个接口表示一个延时的行为可以被取消。通常一个安排好的future是定时任务SchedualedExecutorService的结果
CompleteFuture
一个Future类是显示的完成,而且能被用作一个完成等级,通过它的完成触发支持的依赖函数和行为。当两个或多个线程要执行完成或取消操作时,只有一个能够成功。
ForkJoinTask
基于任务的抽象类,可以通过ForkJoinPool来执行。一个ForkJoinTask是类似于线程实体,但是相对于线程实体是轻量级的。大量的任务和子任务会被ForkJoinPool池中的真实线程挂起来,以某些使用限制为代价。
基本方法

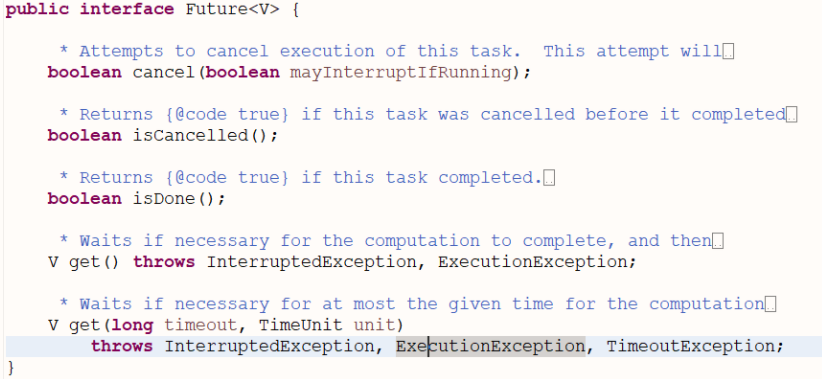
get()方法可以当任务结束后返回一个结果,如果调用时,工作还没有结束,则会阻塞线程,直到任务执行完毕
get(long timeout,TimeUnit unit)做多等待timeout的时间就会返回结果
cancel(boolean mayInterruptIfRunning)方法可以用来停止一个任务,如果任务可以停止(通过mayInterruptIfRunning来进行判断),则可以返回true,如果任务已经完成或者已经停止,或者这个任务无法停止,则会返回false.
isDone()方法判断当前方法是否完成
isCancel()方法判断当前方法是否取消
源码剖析
上文提到过主要实现之一在FutureTask中,在此解析几个重要的实现。其中很重要的state表示其运行的状态并有如下几种状态
    private volatile int state;
    private static final int NEW          = 0;
    private static final int COMPLETING   = 1;
    private static final int NORMAL       = 2;
    private static final int EXCEPTIONAL  = 3;
    private static final int CANCELLED    = 4;
    private static final int INTERRUPTING = 5;
    private static final int INTERRUPTED  = 6;
run,set
public void run() {
    	//1.线程的状态是new则,通过cas将当前线程复制到runnerOffset这个偏移量中
        if (state != NEW ||
            !UNSAFE.compareAndSwapObject(this, runnerOffset,
                                         null, Thread.currentThread()))
            return;
    	//2.执行callable方法
        try {
            Callable<V> c = callable;
            if (c != null && state == NEW) {
                V result;
                boolean ran;
                try {
                    // 将返回值赋值给result
                    result = c.call();
                    ran = true;
                } catch (Throwable ex) {
                    result = null;
                    ran = false;
                    setException(ex);
                }
                if (ran)
                    //改变state,并将返回值赋值给成员变量
                    set(result);
            }
        } finally {
            // runner must be non-null until state is settled to
            // prevent concurrent calls to run()
            runner = null;
            // state must be re-read after nulling runner to prevent
            // leaked interrupts
            int s = state;
            if (s >= INTERRUPTING)
                handlePossibleCancellationInterrupt(s);
        }
    }

	/**
     * Sets the result of this future to the given value unless
     * this future has already been set or has been cancelled.
     *
     * @param v the value
     */
    protected void set(V v) {
        //3.如果state的状态还是new,则将其改为COMPLETING
        if (UNSAFE.compareAndSwapInt(this, stateOffset, NEW, COMPLETING)) {
            //并将返回值赋值给成员变量
            outcome = v;
            //4.返回值赋值完成,将stateOffset赋值为NORMAL
            UNSAFE.putOrderedInt(this, stateOffset, NORMAL); // final state
            // 5.唤醒被阻塞了的线程(避免篇幅过长这里就没有追究其源码)
            finishCompletion();
        }
    }
源码流程解释
- 将运行此方法的线程记录到他的runnerOffset偏移量中
- 运行callable的call方法,并获取到返回值
- 通过set方法判断此线程是否被取消,如果state还是new则将返回结果赋值给成员变量,如果state不是new则不会将结果赋值给成员变量
- 返回值赋值成功后,再将stateOffset变为NORMAL,表示返回值已经赋值成功
- 唤醒被阻塞了的线程(那些调用了get(),被阻塞的方法重新唤醒
get,awaitDone
    /**
     * @throws CancellationException {@inheritDoc}
     */
    public V get(long timeout, TimeUnit unit)
        throws InterruptedException, ExecutionException, TimeoutException {
        if (unit == null)
            throw new NullPointerException();
        int s = state;
        //1 如果还没有运行完成,则执行awaitDone逻辑
        if (s <= COMPLETING &&
            (s = awaitDone(true, unit.toNanos(timeout))) <= COMPLETING)
            throw new TimeoutException();
        return report(s);
    }

     /**
     * Awaits completion or aborts on interrupt or timeout.
     * @param timed true if use timed waits
     * @param nanos time to wait, if timed
     */
    private int awaitDone(boolean timed, long nanos)
        throws InterruptedException {
        //设置阻塞时间
        final long deadline = timed ? System.nanoTime() + nanos : 0L;
        WaitNode q = null;
        boolean queued = false;
        for (;;) {
            if (Thread.interrupted()) {
                removeWaiter(q);
                throw new InterruptedException();
            }

            int s = state;
            //2.如果已完成或者被取消啥的则直接返回
            if (s > COMPLETING) {
                if (q != null)
                    q.thread = null;
                return s;
            }
            //如果是COMPLETING则让出线程资源,因为只差最后一步赋值会很快成功
            else if (s == COMPLETING) // cannot time out yet
                Thread.yield();
            else if (q == null)
                q = new WaitNode();
            //将这个线程加入 一个等待队列中(当执行完成后会通过这个将线程唤醒)
            else if (!queued)
                queued = UNSAFE.compareAndSwapObject(this, waitersOffset,
                                                     q.next = waiters, q);
            //设置调用此方法的线程阻塞时间
            else if (timed) {
                nanos = deadline - System.nanoTime();
                if (nanos <= 0L) {
                    removeWaiter(q);
                    return state;
                }
                LockSupport.parkNanos(this, nanos);
            }
            else
                //阻塞
                LockSupport.park(this);
        }
    }
核心流程
- 如果还没有运行完成,则执行awaitDone逻辑
- awaitDone方法里面的各个if条件的判断一些如源码逻辑中,核心就是设置调用的线程进行阻塞,并将其加入WaitNode的链表中。(还记得run方法的finishCompletion嘛,他就是将链表中的线程一个一个唤醒)
cancel,IsDone
 public boolean isCancelled() {
        return state >= CANCELLED;
    }

    public boolean isDone() {
        return state != NEW;
    }

    public boolean cancel(boolean mayInterruptIfRunning) {
        if (!(state == NEW &&
              UNSAFE.compareAndSwapInt(this, stateOffset, NEW,
                  mayInterruptIfRunning ? INTERRUPTING : CANCELLED)))
            return false;
        try {    // in case call to interrupt throws exception
            if (mayInterruptIfRunning) {
                try {
                    Thread t = runner;
                    if (t != null)
                        t.interrupt();
                } finally { // final state
                    UNSAFE.putOrderedInt(this, stateOffset, INTERRUPTED);
                }
            }
        } finally {
            finishCompletion();
        }
        return true;
    }
如上面的源码所示就是将state的值进行改变
总结
future代码使用cas对state进行更改并保证原子性,state则是控制运行的状态的媒介,以及什么时候唤醒阻塞线程
dubbo异步调用源码解析:https://xuanjian1992.top/2019/03/18/Dubbo-%E5%BC%82%E6%AD%A5%E8%B0%83%E7%94%A8%E5%8E%9F%E7%90%86%E5%88%86%E6%9E%90/
fork-join
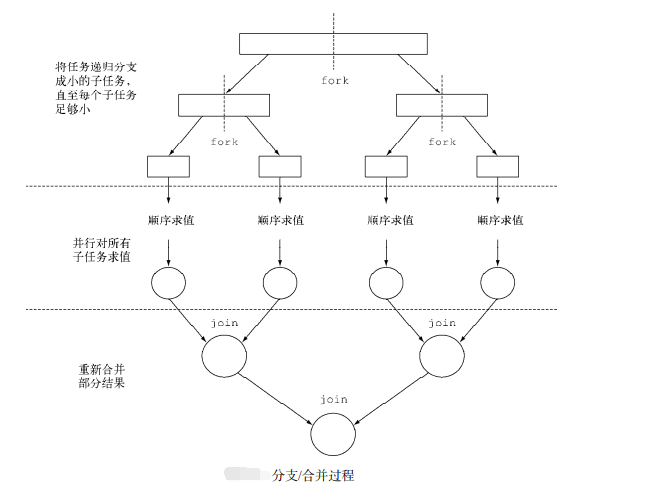
在并行计算中,fork–join模型是设置和执行并行程序的一种方式,使得程序在指定一点上“分叉”(fork)而开始并行执行,在随后的一点上“合并”(join)并恢复顺序执行。并行区块可以递归的fork,直到达到特定的任务粒度(granularity)。
伪代码
解决(问题):
    if 问题足够小:
        直接解决问题 (顺序算法)
    else:
        for 部份 in 细分(问题)
            fork 子任务来解决(部份)
        join 在前面的循环中生成的所有子任务
        return 合并的结果
排序算法中并行的 归并排序就是一种fork-join算法
在java中他对fork-join很较好的支持,让你只需要注意什么时候继续fork(创建子任务),什么时候计算结果,是不是感觉和递归算法的思路一样。还记得上面的的future实现图吗,前面讲了TaskFure中的实现,现在来说另外一个大块,ForkJoinFure

2大实现类RecursiveTask,RecursiveAction,都以Recursive开头其中文意思为递归。且都是抽象类,用了骨架模式,将通用的逻辑全部为我们隐藏(并行逻辑),我们只需要和编写递归一样写代码即可,其他的交给上层的抽象逻辑。
代码实践
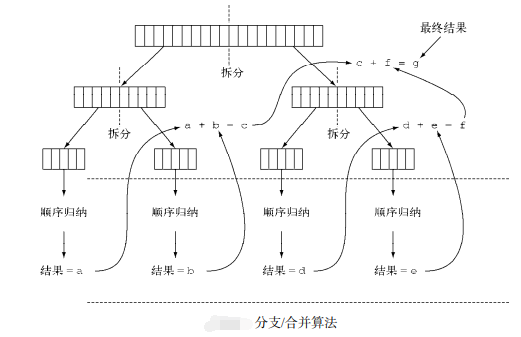
如下代码对2000个随机数求和,但和以前不同。他是将2000个拆分成4个500个的小任务并行执行,利用fork-join框架。
使用流程
ForkJoinFuture 编写流程
- 继承RecursiveTask/RecursiveAction
- 重写其中的compute()方法
- 在compute方法中写主要的运算逻辑 条件为何时继续产生子任务,条件为何时不在需要继续细分 进行运算逻辑处理。
- 将子任务加入fork分发出去 即 invokeAll(task1,task2).
- 调用task的join方法等待task计算完成后的结果
当定义好RecursiveTask/RecursiveAction的具体实现后只需将其实现加入ForkJoinPool即可。
ForkJoinPool线程池可以把一个大任务分拆成小任务并行执行,任务类必须继承自RecursiveTask或RecursiveAction。
Long result = ForkJoinPool.commonPool().invoke(task);
示例代码
public class ForkJoinTest {

    public static void main(String[] args) throws Exception {
        // 创建2000个随机数组成的数组:
        long[] array = new long[2000];
        long expectedSum = 0;
        for (int i = 0; i < array.length; i++) {
            array[i] = random();
            expectedSum += array[i];
        }
        System.out.println("Expected sum: " + expectedSum);
        // fork/join:
        ForkJoinTask<Long> task = new SumTask(array, 0, array.length);
        long startTime = System.currentTimeMillis();
        Long result = ForkJoinPool.commonPool().invoke(task);
        long endTime = System.currentTimeMillis();
        System.out.println("Fork/join sum: " + result + " in " + (endTime - startTime) + " ms.");
    }

    static Random random = new Random(0);

    static long random() {
        return random.nextInt(10000);
    }
}

class SumTask extends RecursiveTask<Long> {
    static final int THRESHOLD = 500;
    long[] array;
    int start;
    int end;

    SumTask(long[] array, int start, int end) {
        this.array = array;
        this.start = start;
        this.end = end;
    }

    @Override
    protected Long compute() {
        if (end - start <= THRESHOLD) {
            // 如果任务足够小,直接计算:
            long sum = 0;
            for (int i = start; i < end; i++) {
                sum += this.array[i];
                // 故意放慢计算速度:
                try {
                    Thread.sleep(1);
                } catch (InterruptedException e) {
                }
            }
            return sum;
        }
        // 任务太大,一分为二:
        int middle = (end + start) / 2;
        System.out.println(String.format("split %d~%d ==> %d~%d, %d~%d", start, end, start, middle, middle, end));
        SumTask subtask1 = new SumTask(this.array, start, middle);
        SumTask subtask2 = new SumTask(this.array, middle, end);
        invokeAll(subtask1, subtask2);
        Long subresult1 = subtask1.join();
        Long subresult2 = subtask2.join();
        Long result = subresult1 + subresult2;
        System.out.println("result = " + subresult1 + " + " + subresult2 + " ==> " + result);
        return result;
    }
}
运行结果
Expected sum: 9788366
split 0~2000 ==> 0~1000, 1000~2000
split 1000~2000 ==> 1000~1500, 1500~2000
split 0~1000 ==> 0~500, 500~1000
result = 2391591 + 2419573 ==> 4811164
result = 2485485 + 2491717 ==> 4977202
result = 4811164 + 4977202 ==> 9788366
Fork/join sum: 9788366 in 2412 ms.
运行示意图


java8 completableFuture
其实2021年了,java8都出来这么久了,completableFuture用于流程异步他不香嘛。他能让你快速将多个异步流程串起来,以及将多个异步流程进行整合。
CompletableFuture可以指定异步处理流程:
thenAccept()处理正常结果;exceptional()处理异常结果;thenApplyAsync()用于串行化另一个CompletableFuture;anyOf()和allOf()用于并行化多个CompletableFuture。
Reactor
响应式编程,spring力推,说未来发展方向,他在completableFuture上的整合更加